
Monday, December 18, 2006
Thursday, December 14, 2006
HTML control used as a web browser
This is an interesting piece of development. This uses the HTML control to create a web browser. I've used the HTML related function modules in this example shown below. In order for this example to work, you need to create a WWW document Id and then call it in your main program. In this example, I've created a document id ZSIVA_BLOG.
1. Go to transaction SMW0
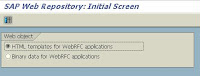 2. click on the HTML template for WebRFC applications and execute
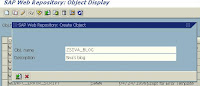
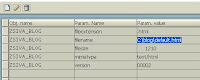
 3. Create new entries and enter the attributes
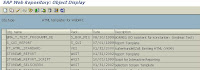
 4. The entry will be created as below:
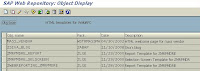 5. Then click on the detail function and assign the basic HTML page that needs to be loaded when your HTML control loads:
 6. Instead you can use the import/export parameters as well from the menu.
7. Then click on the glasses (to display), you can see the base page in a browser.
To enable the web browser, copy the following code into a new executable program:
*&---------------------------------------------------------------------*
*& Report ZNUT_WEB_BROWSER_NEW *
*&---------------------------------------------------------------------*
* Sample program to demonstrate the HTML Control be used as a WEB BROWSER
* Siva Thiagarajan
REPORT ZNUT_WEB_BROWSER_NEW.
INCLUDE.
INCLUDE CNHTINCL.
DATA: H_HTML_CONTROL TYPE CNTL_HANDLE.
DATA: B_INIT TYPE C.
DATA: PROG_REPID LIKE SY-REPID.
DATA: FCODE LIKE SY-UCOMM.
DATA: URL(1024).
SET SCREEN 100.
*&---------------------------------------------------------------------*
*& Module STATUS_0100 OUTPUT
*&---------------------------------------------------------------------*
MODULE STATUS_0100 OUTPUT.
SET PF-STATUS 'TESTHTM1'.
SET TITLEBAR '001'.
IF B_INIT IS INITIAL.
CALL FUNCTION 'CONTROL_INIT'.
PROG_REPID = SY-REPID.
CALL FUNCTION 'HTMLCNTL_CREATE'
EXPORTING
OWNER_REPID = PROG_REPID
LINK_REPID = PROG_REPID
DYNNR = '0100'
CONTAINER = 'HTML_CONTAINER'
CHANGING
HANDLE = H_HTML_CONTROL.
B_INIT = 'x'.
CALL FUNCTION 'HTMLCNTL_INIT'
EXPORTING
H_CONTROL = H_HTML_CONTROL
REGISTER_EVENT_ON_NAVIGATE = 'x'
CB_FORM_NAVIGATE_COMPLETE = 'ON_CONTROL_EVENT'.
PERFORM LOAD_HOME_PAGE.
CALL FUNCTION 'CONTROL_FLUSH'.
ENDIF.
ENDMODULE. " STATUS_0100 OUTPUT
*&---------------------------------------------------------------------*
*& Module USER_COMMAND_0100 INPUT
*&---------------------------------------------------------------------*
MODULE USER_COMMAND_0100 INPUT.
CASE FCODE.
WHEN 'BACK'.
IF NOT B_INIT IS INITIAL.
CALL FUNCTION 'HTMLCNTL_DESTROY'
CHANGING
H_CONTROL = H_HTML_CONTROL
EXCEPTIONS
OTHERS = 1.
CALL FUNCTION 'CONTROL_FLUSH'.
ENDIF.
LEAVE PROGRAM.
WHEN 'HHOM'. " show the home page
CALL FUNCTION 'HTMLCNTL_GO_HOME'
EXPORTING
H_CONTROL = H_HTML_CONTROL.
CALL FUNCTION 'HTMLCNTL_GET_CURRENT_URL'
EXPORTING
H_CONTROL = H_HTML_CONTROL
IMPORTING
URL = URL.
WHEN 'HBAK'.
CALL FUNCTION 'HTMLCNTL_GO_BACK'
EXPORTING
H_CONTROL = H_HTML_CONTROL.
CALL FUNCTION 'HTMLCNTL_GET_CURRENT_URL'
EXPORTING
H_CONTROL = H_HTML_CONTROL
IMPORTING
URL = URL.
WHEN 'HFWD'.
CALL FUNCTION 'HTMLCNTL_GO_FORWARD'
EXPORTING
H_CONTROL = H_HTML_CONTROL.
CALL FUNCTION 'HTMLCNTL_GET_CURRENT_URL'
EXPORTING
H_CONTROL = H_HTML_CONTROL
IMPORTING
URL = URL.
WHEN 'HRFR'.
CALL FUNCTION 'HTMLCNTL_DO_REFRESH'
EXPORTING
H_CONTROL = H_HTML_CONTROL.
CALL FUNCTION 'HTMLCNTL_GET_CURRENT_URL'
EXPORTING
H_CONTROL = H_HTML_CONTROL
IMPORTING
URL = URL.
WHEN 'HNAV'.
CALL FUNCTION 'HTMLCNTL_SHOW_URL'
EXPORTING
H_CONTROL = H_HTML_CONTROL
URL = URL.
WHEN OTHERS.
CALL FUNCTION 'CONTROL_DISPATCH'
EXPORTING
FCODE = FCODE.
ENDCASE.
CLEAR FCODE.
ENDMODULE. " USER_COMMAND_0100 INPUT
* Callback form for the event 'NavigateComplete'
callback on_control_event.
CALL FUNCTION 'CONTROL_GET_EVENT_PARAM'
EXPORTING
H_CONTROL = H_HTML_CONTROL
PARAM_ID = 0
CHANGING
RETURN = URL.
endcallback.
* Homepage form
FORM LOAD_HOME_PAGE.
DATA: DOC_URL(80).
CALL FUNCTION 'HTMLCNTL_LOAD_HTML_DOCUMENT'
EXPORTING
H_CONTROL = H_HTML_CONTROL
DOCUMENT_ID = 'ZSIVA_BLOG'
IMPORTING
ASSIGNED_URL = DOC_URL
EXCEPTIONS
OTHERS = 1.
IF SY-SUBRC EQ 0.
CALL FUNCTION 'HTMLCNTL_SHOW_DATA'
EXPORTING
H_CONTROL = H_HTML_CONTROL
URL = DOC_URL.
ENDIF.
ENDFORM. " LOAD_HOME_PAGE
Fine print:
1. Please create a pf-status TESTHTM1
 2. Create a screen 100 like this:
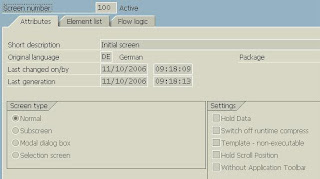
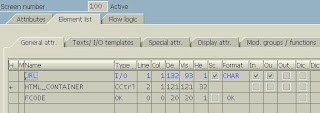
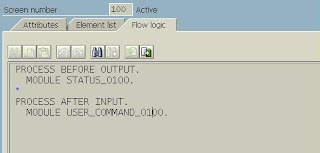 3. The PBO and PAI modules are already handled in the main program.
1. Go to transaction SMW0
 2. click on the HTML template for WebRFC applications and execute
 3. Create new entries and enter the attributes
 4. The entry will be created as below:
 5. Then click on the detail function and assign the basic HTML page that needs to be loaded when your HTML control loads:
 6. Instead you can use the import/export parameters as well from the menu.
7. Then click on the glasses (to display), you can see the base page in a browser.
To enable the web browser, copy the following code into a new executable program:
*&---------------------------------------------------------------------*
*& Report ZNUT_WEB_BROWSER_NEW *
*&---------------------------------------------------------------------*
* Sample program to demonstrate the HTML Control be used as a WEB BROWSER
* Siva Thiagarajan
REPORT ZNUT_WEB_BROWSER_NEW.
INCLUDE
INCLUDE CNHTINCL.
DATA: H_HTML_CONTROL TYPE CNTL_HANDLE.
DATA: B_INIT TYPE C.
DATA: PROG_REPID LIKE SY-REPID.
DATA: FCODE LIKE SY-UCOMM.
DATA: URL(1024).
SET SCREEN 100.
*&---------------------------------------------------------------------*
*& Module STATUS_0100 OUTPUT
*&---------------------------------------------------------------------*
MODULE STATUS_0100 OUTPUT.
SET PF-STATUS 'TESTHTM1'.
SET TITLEBAR '001'.
IF B_INIT IS INITIAL.
CALL FUNCTION 'CONTROL_INIT'.
PROG_REPID = SY-REPID.
CALL FUNCTION 'HTMLCNTL_CREATE'
EXPORTING
OWNER_REPID = PROG_REPID
LINK_REPID = PROG_REPID
DYNNR = '0100'
CONTAINER = 'HTML_CONTAINER'
CHANGING
HANDLE = H_HTML_CONTROL.
B_INIT = 'x'.
CALL FUNCTION 'HTMLCNTL_INIT'
EXPORTING
H_CONTROL = H_HTML_CONTROL
REGISTER_EVENT_ON_NAVIGATE = 'x'
CB_FORM_NAVIGATE_COMPLETE = 'ON_CONTROL_EVENT'.
PERFORM LOAD_HOME_PAGE.
CALL FUNCTION 'CONTROL_FLUSH'.
ENDIF.
ENDMODULE. " STATUS_0100 OUTPUT
*&---------------------------------------------------------------------*
*& Module USER_COMMAND_0100 INPUT
*&---------------------------------------------------------------------*
MODULE USER_COMMAND_0100 INPUT.
CASE FCODE.
WHEN 'BACK'.
IF NOT B_INIT IS INITIAL.
CALL FUNCTION 'HTMLCNTL_DESTROY'
CHANGING
H_CONTROL = H_HTML_CONTROL
EXCEPTIONS
OTHERS = 1.
CALL FUNCTION 'CONTROL_FLUSH'.
ENDIF.
LEAVE PROGRAM.
WHEN 'HHOM'. " show the home page
CALL FUNCTION 'HTMLCNTL_GO_HOME'
EXPORTING
H_CONTROL = H_HTML_CONTROL.
CALL FUNCTION 'HTMLCNTL_GET_CURRENT_URL'
EXPORTING
H_CONTROL = H_HTML_CONTROL
IMPORTING
URL = URL.
WHEN 'HBAK'.
CALL FUNCTION 'HTMLCNTL_GO_BACK'
EXPORTING
H_CONTROL = H_HTML_CONTROL.
CALL FUNCTION 'HTMLCNTL_GET_CURRENT_URL'
EXPORTING
H_CONTROL = H_HTML_CONTROL
IMPORTING
URL = URL.
WHEN 'HFWD'.
CALL FUNCTION 'HTMLCNTL_GO_FORWARD'
EXPORTING
H_CONTROL = H_HTML_CONTROL.
CALL FUNCTION 'HTMLCNTL_GET_CURRENT_URL'
EXPORTING
H_CONTROL = H_HTML_CONTROL
IMPORTING
URL = URL.
WHEN 'HRFR'.
CALL FUNCTION 'HTMLCNTL_DO_REFRESH'
EXPORTING
H_CONTROL = H_HTML_CONTROL.
CALL FUNCTION 'HTMLCNTL_GET_CURRENT_URL'
EXPORTING
H_CONTROL = H_HTML_CONTROL
IMPORTING
URL = URL.
WHEN 'HNAV'.
CALL FUNCTION 'HTMLCNTL_SHOW_URL'
EXPORTING
H_CONTROL = H_HTML_CONTROL
URL = URL.
WHEN OTHERS.
CALL FUNCTION 'CONTROL_DISPATCH'
EXPORTING
FCODE = FCODE.
ENDCASE.
CLEAR FCODE.
ENDMODULE. " USER_COMMAND_0100 INPUT
* Callback form for the event 'NavigateComplete'
callback on_control_event.
CALL FUNCTION 'CONTROL_GET_EVENT_PARAM'
EXPORTING
H_CONTROL = H_HTML_CONTROL
PARAM_ID = 0
CHANGING
RETURN = URL.
endcallback.
* Homepage form
FORM LOAD_HOME_PAGE.
DATA: DOC_URL(80).
CALL FUNCTION 'HTMLCNTL_LOAD_HTML_DOCUMENT'
EXPORTING
H_CONTROL = H_HTML_CONTROL
DOCUMENT_ID = 'ZSIVA_BLOG'
IMPORTING
ASSIGNED_URL = DOC_URL
EXCEPTIONS
OTHERS = 1.
IF SY-SUBRC EQ 0.
CALL FUNCTION 'HTMLCNTL_SHOW_DATA'
EXPORTING
H_CONTROL = H_HTML_CONTROL
URL = DOC_URL.
ENDIF.
ENDFORM. " LOAD_HOME_PAGE
Fine print:
1. Please create a pf-status TESTHTM1
 2. Create a screen 100 like this:

 3. The PBO and PAI modules are already handled in the main program.
BDT Development - II
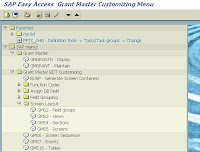
The following is the step by step instruction on how to use the BDT to create enhancments to the Grants master screen. Using BDT development to creating a new Tab on the grants management master data transaction (GMGRANT). Please make a note that unlike the common logistics transactions which will have the four part transaction set such as create, Chage, Display and Delete, the grants transaction is one maintanence transaction which includes all the above mentioned functions. All the customizing we do using BDT has to keep this concept in mind during the development
- Execute grants management BDT development transaction (GRANT_CUSTOMIZE)
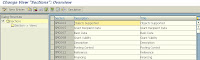
- Grant Master BDT Customizing-> Screen layout and select ‘Field groups’(GMS2)
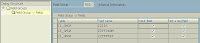
 - Click on ‘New Entries’. Try to maintain the field grouping number more than 500, to make sure it is in the customer name space and will not accidentaly interfear with SAP's standard values.
 - Go back to main field group screen, select your new entry and double click on the
‘Field Group-> Fields’ folder option from the left column. Now enter your fields, for this example I have created some new entries which will be added as part of a new tab.
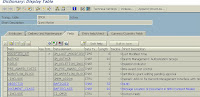
 In order to create the custom fields, we nned to go to the table GMGR, and double click on the extension structure CI_GMGR. This is the structure that will hold all custom created fields and will automatically get appended to the BAPI extension structure. When you want to use the BAPI for accessing the Grants master data, we can use the extension_in and extension_out methods.

- Return to main BDT customizing screen and select ‘Views’(GMS3). Then click the ’New Entries’ button. In this example I've created a view called ZMG007 (Internal information ). The View is the important part of this development as majority of the development happens here in this place. The view is a logical collection of field group and is a screen by itself. You will have a screen developed which will have a PBO and PAI routines. In addition to that we will have three place holders in which we can have our own routined to perform the requiredtasks. They are:
(a) Before screen call-up
(b) Before Output
(c) After Entry
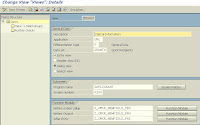 For this example I've used three custom function modules that will be used in the above mentioned place gholders. Then double click on the field group (from the left frame), and enter the field group we created in the earlier step
 One more interesting note is that the option of having 'Further check'. Click on the further check from the left frame and here you can have one more routine, to do any sort of validations that can be performed after the view. This is in addition to the PAI routine for the screen and the function module at 'After Entry'. This further check is very useful in the case if you are required to some validations in the SAP provided views. I'll give an example we had done to add some validations to the grants currency for certain types of grants.
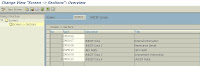
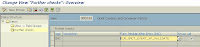 - Return to main BDT customizing screen and select ‘Sections’(GMS4).
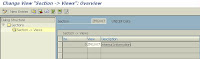
 Then click the ’New Entries’ button and enter the views that are required in the section. A section is a collection of one or more views. And go back to main Sections screen, select your new entry and double click on the Section-> Views folder option from the left column. Now enter the new view you created previously.
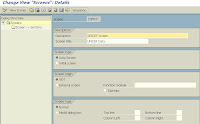
 The last step in this process is to create the screen. A screen is a collection of one or more sections.
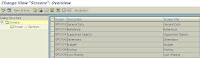 Select 'New Entries' and enter the attributes for the screen. We have a lot of options in this place, but will discuss it later in detail.
 Click on the Sections from the left side frame and start additng the sections that are required for this screen.
 Once the screens are developed, it is time to work on the sequence in which they will be displayed. The next transaction qill tell you how to order the screens both SAP delivered and the custom developed screens.
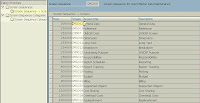
Return to main BDT customizing screen and select ‘Screen Sequence’(GMS6). Then select the screen sequence entry and double click on the Screen Sequence -> Screens folder option from the left column.
 Then create a screen sequence (or) modify he existing one.
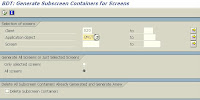
 The final step is to generate the screen sequence to reflect the final changes.
Execute transaction BUSP (click on option from main grant customizing menu), new screen will now appear as tab on grant master transaction ‘GMGRANT’
That's All!!!! As usual if in doubt, please post your comments.
- Execute grants management BDT development transaction (GRANT_CUSTOMIZE)
- Grant Master BDT Customizing-> Screen layout and select ‘Field groups’(GMS2)
 - Click on ‘New Entries’. Try to maintain the field grouping number more than 500, to make sure it is in the customer name space and will not accidentaly interfear with SAP's standard values.
 - Go back to main field group screen, select your new entry and double click on the
‘Field Group-> Fields’ folder option from the left column. Now enter your fields, for this example I have created some new entries which will be added as part of a new tab.
 In order to create the custom fields, we nned to go to the table GMGR, and double click on the extension structure CI_GMGR. This is the structure that will hold all custom created fields and will automatically get appended to the BAPI extension structure. When you want to use the BAPI for accessing the Grants master data, we can use the extension_in and extension_out methods.

- Return to main BDT customizing screen and select ‘Views’(GMS3). Then click the ’New Entries’ button. In this example I've created a view called ZMG007 (Internal information ). The View is the important part of this development as majority of the development happens here in this place. The view is a logical collection of field group and is a screen by itself. You will have a screen developed which will have a PBO and PAI routines. In addition to that we will have three place holders in which we can have our own routined to perform the requiredtasks. They are:
(a) Before screen call-up
(b) Before Output
(c) After Entry
 For this example I've used three custom function modules that will be used in the above mentioned place gholders. Then double click on the field group (from the left frame), and enter the field group we created in the earlier step
 One more interesting note is that the option of having 'Further check'. Click on the further check from the left frame and here you can have one more routine, to do any sort of validations that can be performed after the view. This is in addition to the PAI routine for the screen and the function module at 'After Entry'. This further check is very useful in the case if you are required to some validations in the SAP provided views. I'll give an example we had done to add some validations to the grants currency for certain types of grants.
 - Return to main BDT customizing screen and select ‘Sections’(GMS4).
 Then click the ’New Entries’ button and enter the views that are required in the section. A section is a collection of one or more views. And go back to main Sections screen, select your new entry and double click on the Section-> Views folder option from the left column. Now enter the new view you created previously.
 The last step in this process is to create the screen. A screen is a collection of one or more sections.
 Select 'New Entries' and enter the attributes for the screen. We have a lot of options in this place, but will discuss it later in detail.
 Click on the Sections from the left side frame and start additng the sections that are required for this screen.
 Once the screens are developed, it is time to work on the sequence in which they will be displayed. The next transaction qill tell you how to order the screens both SAP delivered and the custom developed screens.
Return to main BDT customizing screen and select ‘Screen Sequence’(GMS6). Then select the screen sequence entry and double click on the Screen Sequence -> Screens folder option from the left column.
 Then create a screen sequence (or) modify he existing one.
 The final step is to generate the screen sequence to reflect the final changes.
Execute transaction BUSP (click on option from main grant customizing menu), new screen will now appear as tab on grant master transaction ‘GMGRANT’

That's All!!!! As usual if in doubt, please post your comments.
Subscribe to:
Posts (Atom)