
Monday, December 18, 2006
Thursday, December 14, 2006
HTML control used as a web browser
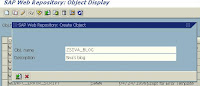
This is an interesting piece of development. This uses the HTML control to create a web browser. I've used the HTML related function modules in this example shown below. In order for this example to work, you need to create a WWW document Id and then call it in your main program. In this example, I've created a document id ZSIVA_BLOG.
1. Go to transaction SMW0
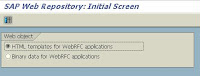 2. click on the HTML template for WebRFC applications and execute
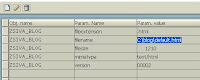
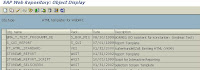 3. Create new entries and enter the attributes
 4. The entry will be created as below:
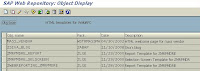 5. Then click on the detail function and assign the basic HTML page that needs to be loaded when your HTML control loads:
 6. Instead you can use the import/export parameters as well from the menu.
7. Then click on the glasses (to display), you can see the base page in a browser.
To enable the web browser, copy the following code into a new executable program:
*&---------------------------------------------------------------------*
*& Report ZNUT_WEB_BROWSER_NEW *
*&---------------------------------------------------------------------*
* Sample program to demonstrate the HTML Control be used as a WEB BROWSER
* Siva Thiagarajan
REPORT ZNUT_WEB_BROWSER_NEW.
INCLUDE.
INCLUDE CNHTINCL.
DATA: H_HTML_CONTROL TYPE CNTL_HANDLE.
DATA: B_INIT TYPE C.
DATA: PROG_REPID LIKE SY-REPID.
DATA: FCODE LIKE SY-UCOMM.
DATA: URL(1024).
SET SCREEN 100.
*&---------------------------------------------------------------------*
*& Module STATUS_0100 OUTPUT
*&---------------------------------------------------------------------*
MODULE STATUS_0100 OUTPUT.
SET PF-STATUS 'TESTHTM1'.
SET TITLEBAR '001'.
IF B_INIT IS INITIAL.
CALL FUNCTION 'CONTROL_INIT'.
PROG_REPID = SY-REPID.
CALL FUNCTION 'HTMLCNTL_CREATE'
EXPORTING
OWNER_REPID = PROG_REPID
LINK_REPID = PROG_REPID
DYNNR = '0100'
CONTAINER = 'HTML_CONTAINER'
CHANGING
HANDLE = H_HTML_CONTROL.
B_INIT = 'x'.
CALL FUNCTION 'HTMLCNTL_INIT'
EXPORTING
H_CONTROL = H_HTML_CONTROL
REGISTER_EVENT_ON_NAVIGATE = 'x'
CB_FORM_NAVIGATE_COMPLETE = 'ON_CONTROL_EVENT'.
PERFORM LOAD_HOME_PAGE.
CALL FUNCTION 'CONTROL_FLUSH'.
ENDIF.
ENDMODULE. " STATUS_0100 OUTPUT
*&---------------------------------------------------------------------*
*& Module USER_COMMAND_0100 INPUT
*&---------------------------------------------------------------------*
MODULE USER_COMMAND_0100 INPUT.
CASE FCODE.
WHEN 'BACK'.
IF NOT B_INIT IS INITIAL.
CALL FUNCTION 'HTMLCNTL_DESTROY'
CHANGING
H_CONTROL = H_HTML_CONTROL
EXCEPTIONS
OTHERS = 1.
CALL FUNCTION 'CONTROL_FLUSH'.
ENDIF.
LEAVE PROGRAM.
WHEN 'HHOM'. " show the home page
CALL FUNCTION 'HTMLCNTL_GO_HOME'
EXPORTING
H_CONTROL = H_HTML_CONTROL.
CALL FUNCTION 'HTMLCNTL_GET_CURRENT_URL'
EXPORTING
H_CONTROL = H_HTML_CONTROL
IMPORTING
URL = URL.
WHEN 'HBAK'.
CALL FUNCTION 'HTMLCNTL_GO_BACK'
EXPORTING
H_CONTROL = H_HTML_CONTROL.
CALL FUNCTION 'HTMLCNTL_GET_CURRENT_URL'
EXPORTING
H_CONTROL = H_HTML_CONTROL
IMPORTING
URL = URL.
WHEN 'HFWD'.
CALL FUNCTION 'HTMLCNTL_GO_FORWARD'
EXPORTING
H_CONTROL = H_HTML_CONTROL.
CALL FUNCTION 'HTMLCNTL_GET_CURRENT_URL'
EXPORTING
H_CONTROL = H_HTML_CONTROL
IMPORTING
URL = URL.
WHEN 'HRFR'.
CALL FUNCTION 'HTMLCNTL_DO_REFRESH'
EXPORTING
H_CONTROL = H_HTML_CONTROL.
CALL FUNCTION 'HTMLCNTL_GET_CURRENT_URL'
EXPORTING
H_CONTROL = H_HTML_CONTROL
IMPORTING
URL = URL.
WHEN 'HNAV'.
CALL FUNCTION 'HTMLCNTL_SHOW_URL'
EXPORTING
H_CONTROL = H_HTML_CONTROL
URL = URL.
WHEN OTHERS.
CALL FUNCTION 'CONTROL_DISPATCH'
EXPORTING
FCODE = FCODE.
ENDCASE.
CLEAR FCODE.
ENDMODULE. " USER_COMMAND_0100 INPUT
* Callback form for the event 'NavigateComplete'
callback on_control_event.
CALL FUNCTION 'CONTROL_GET_EVENT_PARAM'
EXPORTING
H_CONTROL = H_HTML_CONTROL
PARAM_ID = 0
CHANGING
RETURN = URL.
endcallback.
* Homepage form
FORM LOAD_HOME_PAGE.
DATA: DOC_URL(80).
CALL FUNCTION 'HTMLCNTL_LOAD_HTML_DOCUMENT'
EXPORTING
H_CONTROL = H_HTML_CONTROL
DOCUMENT_ID = 'ZSIVA_BLOG'
IMPORTING
ASSIGNED_URL = DOC_URL
EXCEPTIONS
OTHERS = 1.
IF SY-SUBRC EQ 0.
CALL FUNCTION 'HTMLCNTL_SHOW_DATA'
EXPORTING
H_CONTROL = H_HTML_CONTROL
URL = DOC_URL.
ENDIF.
ENDFORM. " LOAD_HOME_PAGE
Fine print:
1. Please create a pf-status TESTHTM1
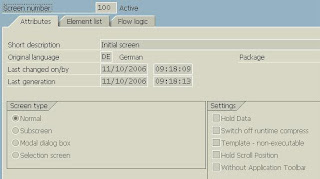
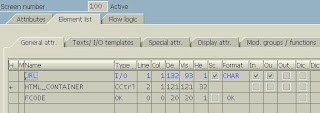
 2. Create a screen 100 like this:
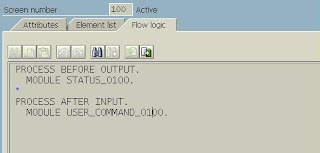 3. The PBO and PAI modules are already handled in the main program.
1. Go to transaction SMW0
 2. click on the HTML template for WebRFC applications and execute
 3. Create new entries and enter the attributes
 4. The entry will be created as below:
 5. Then click on the detail function and assign the basic HTML page that needs to be loaded when your HTML control loads:
 6. Instead you can use the import/export parameters as well from the menu.
7. Then click on the glasses (to display), you can see the base page in a browser.
To enable the web browser, copy the following code into a new executable program:
*&---------------------------------------------------------------------*
*& Report ZNUT_WEB_BROWSER_NEW *
*&---------------------------------------------------------------------*
* Sample program to demonstrate the HTML Control be used as a WEB BROWSER
* Siva Thiagarajan
REPORT ZNUT_WEB_BROWSER_NEW.
INCLUDE
INCLUDE CNHTINCL.
DATA: H_HTML_CONTROL TYPE CNTL_HANDLE.
DATA: B_INIT TYPE C.
DATA: PROG_REPID LIKE SY-REPID.
DATA: FCODE LIKE SY-UCOMM.
DATA: URL(1024).
SET SCREEN 100.
*&---------------------------------------------------------------------*
*& Module STATUS_0100 OUTPUT
*&---------------------------------------------------------------------*
MODULE STATUS_0100 OUTPUT.
SET PF-STATUS 'TESTHTM1'.
SET TITLEBAR '001'.
IF B_INIT IS INITIAL.
CALL FUNCTION 'CONTROL_INIT'.
PROG_REPID = SY-REPID.
CALL FUNCTION 'HTMLCNTL_CREATE'
EXPORTING
OWNER_REPID = PROG_REPID
LINK_REPID = PROG_REPID
DYNNR = '0100'
CONTAINER = 'HTML_CONTAINER'
CHANGING
HANDLE = H_HTML_CONTROL.
B_INIT = 'x'.
CALL FUNCTION 'HTMLCNTL_INIT'
EXPORTING
H_CONTROL = H_HTML_CONTROL
REGISTER_EVENT_ON_NAVIGATE = 'x'
CB_FORM_NAVIGATE_COMPLETE = 'ON_CONTROL_EVENT'.
PERFORM LOAD_HOME_PAGE.
CALL FUNCTION 'CONTROL_FLUSH'.
ENDIF.
ENDMODULE. " STATUS_0100 OUTPUT
*&---------------------------------------------------------------------*
*& Module USER_COMMAND_0100 INPUT
*&---------------------------------------------------------------------*
MODULE USER_COMMAND_0100 INPUT.
CASE FCODE.
WHEN 'BACK'.
IF NOT B_INIT IS INITIAL.
CALL FUNCTION 'HTMLCNTL_DESTROY'
CHANGING
H_CONTROL = H_HTML_CONTROL
EXCEPTIONS
OTHERS = 1.
CALL FUNCTION 'CONTROL_FLUSH'.
ENDIF.
LEAVE PROGRAM.
WHEN 'HHOM'. " show the home page
CALL FUNCTION 'HTMLCNTL_GO_HOME'
EXPORTING
H_CONTROL = H_HTML_CONTROL.
CALL FUNCTION 'HTMLCNTL_GET_CURRENT_URL'
EXPORTING
H_CONTROL = H_HTML_CONTROL
IMPORTING
URL = URL.
WHEN 'HBAK'.
CALL FUNCTION 'HTMLCNTL_GO_BACK'
EXPORTING
H_CONTROL = H_HTML_CONTROL.
CALL FUNCTION 'HTMLCNTL_GET_CURRENT_URL'
EXPORTING
H_CONTROL = H_HTML_CONTROL
IMPORTING
URL = URL.
WHEN 'HFWD'.
CALL FUNCTION 'HTMLCNTL_GO_FORWARD'
EXPORTING
H_CONTROL = H_HTML_CONTROL.
CALL FUNCTION 'HTMLCNTL_GET_CURRENT_URL'
EXPORTING
H_CONTROL = H_HTML_CONTROL
IMPORTING
URL = URL.
WHEN 'HRFR'.
CALL FUNCTION 'HTMLCNTL_DO_REFRESH'
EXPORTING
H_CONTROL = H_HTML_CONTROL.
CALL FUNCTION 'HTMLCNTL_GET_CURRENT_URL'
EXPORTING
H_CONTROL = H_HTML_CONTROL
IMPORTING
URL = URL.
WHEN 'HNAV'.
CALL FUNCTION 'HTMLCNTL_SHOW_URL'
EXPORTING
H_CONTROL = H_HTML_CONTROL
URL = URL.
WHEN OTHERS.
CALL FUNCTION 'CONTROL_DISPATCH'
EXPORTING
FCODE = FCODE.
ENDCASE.
CLEAR FCODE.
ENDMODULE. " USER_COMMAND_0100 INPUT
* Callback form for the event 'NavigateComplete'
callback on_control_event.
CALL FUNCTION 'CONTROL_GET_EVENT_PARAM'
EXPORTING
H_CONTROL = H_HTML_CONTROL
PARAM_ID = 0
CHANGING
RETURN = URL.
endcallback.
* Homepage form
FORM LOAD_HOME_PAGE.
DATA: DOC_URL(80).
CALL FUNCTION 'HTMLCNTL_LOAD_HTML_DOCUMENT'
EXPORTING
H_CONTROL = H_HTML_CONTROL
DOCUMENT_ID = 'ZSIVA_BLOG'
IMPORTING
ASSIGNED_URL = DOC_URL
EXCEPTIONS
OTHERS = 1.
IF SY-SUBRC EQ 0.
CALL FUNCTION 'HTMLCNTL_SHOW_DATA'
EXPORTING
H_CONTROL = H_HTML_CONTROL
URL = DOC_URL.
ENDIF.
ENDFORM. " LOAD_HOME_PAGE
Fine print:
1. Please create a pf-status TESTHTM1
 2. Create a screen 100 like this:

 3. The PBO and PAI modules are already handled in the main program.
BDT Development - II
The following is the step by step instruction on how to use the BDT to create enhancments to the Grants master screen. Using BDT development to creating a new Tab on the grants management master data transaction (GMGRANT). Please make a note that unlike the common logistics transactions which will have the four part transaction set such as create, Chage, Display and Delete, the grants transaction is one maintanence transaction which includes all the above mentioned functions. All the customizing we do using BDT has to keep this concept in mind during the development
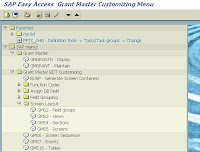
- Execute grants management BDT development transaction (GRANT_CUSTOMIZE)
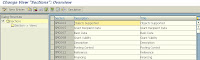
- Grant Master BDT Customizing-> Screen layout and select ‘Field groups’(GMS2)
 - Click on ‘New Entries’. Try to maintain the field grouping number more than 500, to make sure it is in the customer name space and will not accidentaly interfear with SAP's standard values.
 - Go back to main field group screen, select your new entry and double click on the
‘Field Group-> Fields’ folder option from the left column. Now enter your fields, for this example I have created some new entries which will be added as part of a new tab.
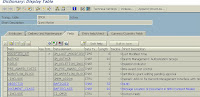
 In order to create the custom fields, we nned to go to the table GMGR, and double click on the extension structure CI_GMGR. This is the structure that will hold all custom created fields and will automatically get appended to the BAPI extension structure. When you want to use the BAPI for accessing the Grants master data, we can use the extension_in and extension_out methods.

- Return to main BDT customizing screen and select ‘Views’(GMS3). Then click the ’New Entries’ button. In this example I've created a view called ZMG007 (Internal information ). The View is the important part of this development as majority of the development happens here in this place. The view is a logical collection of field group and is a screen by itself. You will have a screen developed which will have a PBO and PAI routines. In addition to that we will have three place holders in which we can have our own routined to perform the requiredtasks. They are:
(a) Before screen call-up
(b) Before Output
(c) After Entry
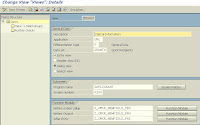 For this example I've used three custom function modules that will be used in the above mentioned place gholders. Then double click on the field group (from the left frame), and enter the field group we created in the earlier step
 One more interesting note is that the option of having 'Further check'. Click on the further check from the left frame and here you can have one more routine, to do any sort of validations that can be performed after the view. This is in addition to the PAI routine for the screen and the function module at 'After Entry'. This further check is very useful in the case if you are required to some validations in the SAP provided views. I'll give an example we had done to add some validations to the grants currency for certain types of grants.
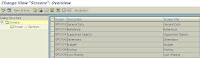
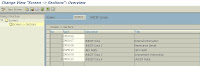
 - Return to main BDT customizing screen and select ‘Sections’(GMS4).
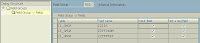
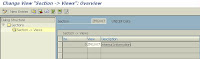
 Then click the ’New Entries’ button and enter the views that are required in the section. A section is a collection of one or more views. And go back to main Sections screen, select your new entry and double click on the Section-> Views folder option from the left column. Now enter the new view you created previously.
 The last step in this process is to create the screen. A screen is a collection of one or more sections.
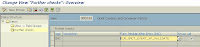
 Select 'New Entries' and enter the attributes for the screen. We have a lot of options in this place, but will discuss it later in detail.
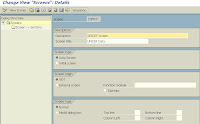 Click on the Sections from the left side frame and start additng the sections that are required for this screen.
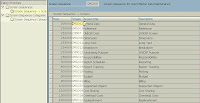
 Once the screens are developed, it is time to work on the sequence in which they will be displayed. The next transaction qill tell you how to order the screens both SAP delivered and the custom developed screens.
Return to main BDT customizing screen and select ‘Screen Sequence’(GMS6). Then select the screen sequence entry and double click on the Screen Sequence -> Screens folder option from the left column.
 Then create a screen sequence (or) modify he existing one.
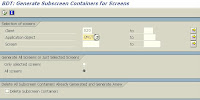
 The final step is to generate the screen sequence to reflect the final changes.
Execute transaction BUSP (click on option from main grant customizing menu), new screen will now appear as tab on grant master transaction ‘GMGRANT’
That's All!!!! As usual if in doubt, please post your comments.
- Execute grants management BDT development transaction (GRANT_CUSTOMIZE)
- Grant Master BDT Customizing-> Screen layout and select ‘Field groups’(GMS2)
 - Click on ‘New Entries’. Try to maintain the field grouping number more than 500, to make sure it is in the customer name space and will not accidentaly interfear with SAP's standard values.
 - Go back to main field group screen, select your new entry and double click on the
‘Field Group-> Fields’ folder option from the left column. Now enter your fields, for this example I have created some new entries which will be added as part of a new tab.
 In order to create the custom fields, we nned to go to the table GMGR, and double click on the extension structure CI_GMGR. This is the structure that will hold all custom created fields and will automatically get appended to the BAPI extension structure. When you want to use the BAPI for accessing the Grants master data, we can use the extension_in and extension_out methods.

- Return to main BDT customizing screen and select ‘Views’(GMS3). Then click the ’New Entries’ button. In this example I've created a view called ZMG007 (Internal information ). The View is the important part of this development as majority of the development happens here in this place. The view is a logical collection of field group and is a screen by itself. You will have a screen developed which will have a PBO and PAI routines. In addition to that we will have three place holders in which we can have our own routined to perform the requiredtasks. They are:
(a) Before screen call-up
(b) Before Output
(c) After Entry
 For this example I've used three custom function modules that will be used in the above mentioned place gholders. Then double click on the field group (from the left frame), and enter the field group we created in the earlier step
 One more interesting note is that the option of having 'Further check'. Click on the further check from the left frame and here you can have one more routine, to do any sort of validations that can be performed after the view. This is in addition to the PAI routine for the screen and the function module at 'After Entry'. This further check is very useful in the case if you are required to some validations in the SAP provided views. I'll give an example we had done to add some validations to the grants currency for certain types of grants.
 - Return to main BDT customizing screen and select ‘Sections’(GMS4).
 Then click the ’New Entries’ button and enter the views that are required in the section. A section is a collection of one or more views. And go back to main Sections screen, select your new entry and double click on the Section-> Views folder option from the left column. Now enter the new view you created previously.
 The last step in this process is to create the screen. A screen is a collection of one or more sections.
 Select 'New Entries' and enter the attributes for the screen. We have a lot of options in this place, but will discuss it later in detail.
 Click on the Sections from the left side frame and start additng the sections that are required for this screen.
 Once the screens are developed, it is time to work on the sequence in which they will be displayed. The next transaction qill tell you how to order the screens both SAP delivered and the custom developed screens.
Return to main BDT customizing screen and select ‘Screen Sequence’(GMS6). Then select the screen sequence entry and double click on the Screen Sequence -> Screens folder option from the left column.
 Then create a screen sequence (or) modify he existing one.
 The final step is to generate the screen sequence to reflect the final changes.
Execute transaction BUSP (click on option from main grant customizing menu), new screen will now appear as tab on grant master transaction ‘GMGRANT’

That's All!!!! As usual if in doubt, please post your comments.
Monday, November 06, 2006
Generic Object Services
Generic Object Services – Linking IDoc to the Business object.


Overview:
The business object and its related services can be linked using Generic object services. This is a very clean way of seeing thing right from the application which can be either master data or transactions. This document explains the ways to link the objects that are created in the customer name space. Most of the SAP’s standard services are pre built to perform this action.
When you publish the custom Business object using the function module ‘SWU_OBJECT_PUBLISH’ , a object service toolbox appears for the related business object in its business transaction.
The following services can be started in the toolbox,
| Toolbox Entry | Submenu | Link to Description |
| Create... | Create Attachment | Appending a PC Document to an Object |
| Create Note | Creating a Note for an Object | |
| Create External Document (URL) | Appending a Link to a Web Page | |
| Store Business Document | Appending and Archiving a PC Document to an Object | |
| Enter Bar Code | Assigning an Object the Bar Code of a Document | |
| Attachment List | | Displaying Attachments |
| Personal Note | | Creating a Personal Note for an Object |
| Send Object with Note | Send Object with Note | Sending an Object with a Note |
| Object Outbox | Displaying the Object Outbox | |
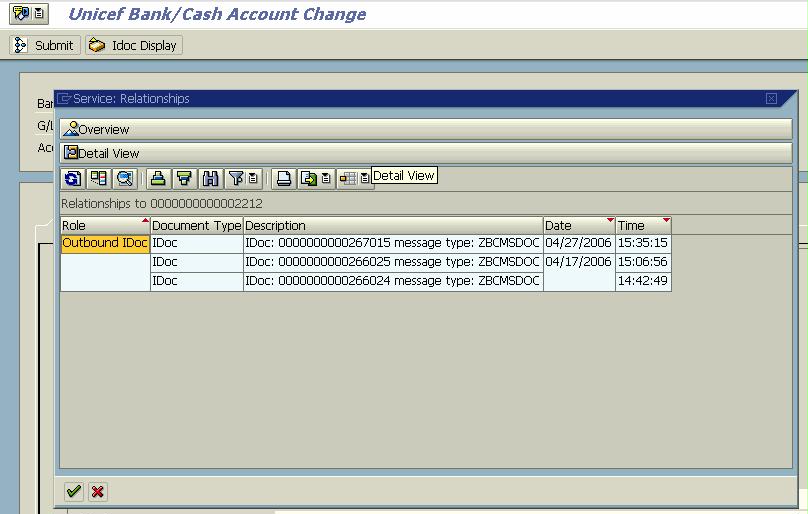
| Display Relationships | | Displaying Relationships |
| Workflow | Workflow Overview | Displaying Workflows for an Object |
| Archived Workflows | ||
| Start Workflow | Starting a Workflow for an Object | |
| My Objects | Add to My Objects | Adding Object to your Favorites |
| Subscribe/Cancel Object | Subscribing to Messages About Changes to an Object | |
| Telephony | | Telephony |
| Actions | | Activating PPF Actions |
In this example document, We will try to demonstrate the incoming and outgoing Idocs can be linked to the Business object and they can be viewed using the relationship service in the toolbox from within the application. The scenario here will be like theis:
The Idocs are created in a separate ALE distribution program and not in the same business transaction. The objective is to link the Idocs created in the separate program to its corresponding business object and should be made available in the relationship service.
The following steps are involved for linking the Idoc to its corresponding Business object.
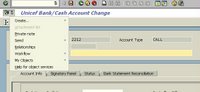
For illustration let us link the outbound and inbound Idocs to the customized business object ‘Bank account’ (ZUNBANK).
Before linking the Idoc with the business object, the relationship service in the tool box appears disabled as below, meaning that the system cannot show or display the related service objects.

For Outbound Idoc:
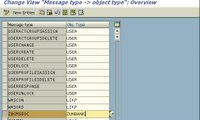
Step 1: BDA4: Link the Idoc message type to the Business object type. In this example the message type, the idoc and the business objects are all in the customer name space.
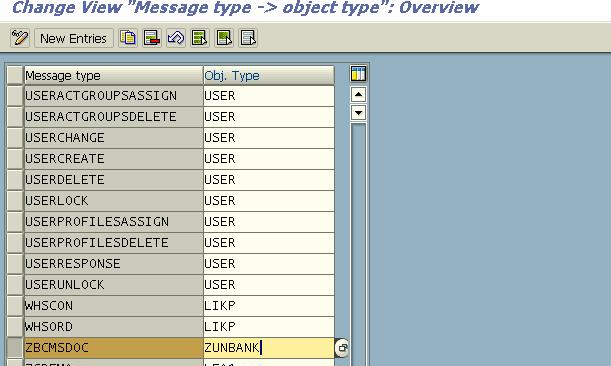
The Idoc message type is linked to the object type.
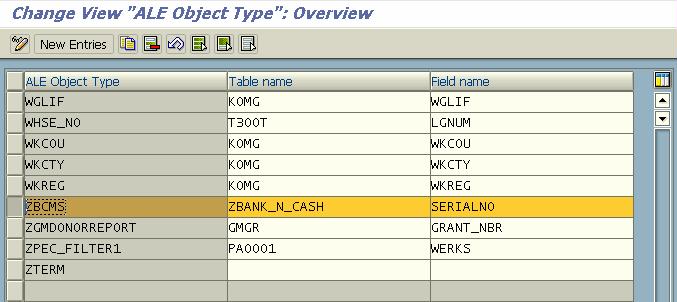
Step 2:BD95: Define the ALE object type. This is just an object definition and link this to the master table and the key field.
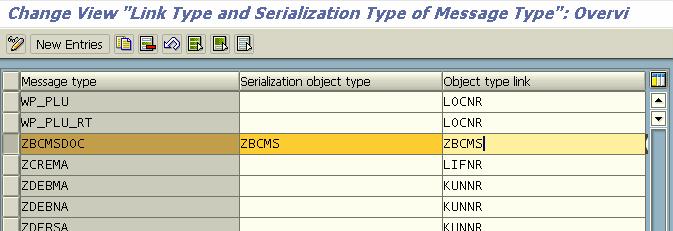
Step 3: BD57: Define the link object type for the message type.
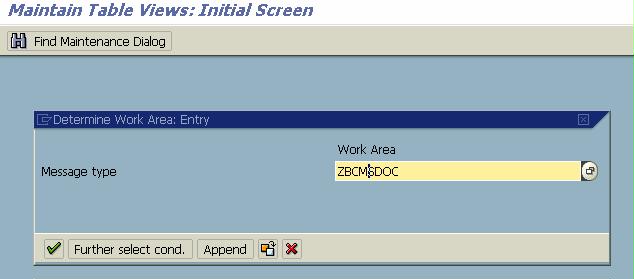
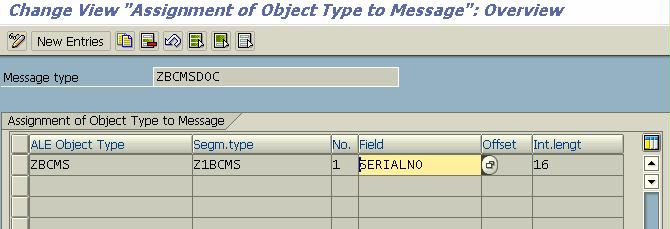
Step 4: BD59: Assignment of object type to message
Step 5: Execute the corresponding ALE distribution program and create the Idoc.
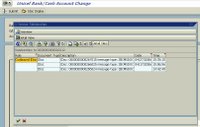
Now the relationship service in the toolbox is enabled.

The corresponding Idoc is displayed
For Inbound Idoc:
The inbound idoc linking is a little bit trickier than the outbound. In the case of the outbound, the file creation is in our hands and we can establish the linkage as we create and distribute the file, whereas in the inbound the same needs to be accomplished in the inbound function module. Though it is only a single step action, I’ll try to put in my next posting.
Thanks to my colleague Praveen Antony for his contributions for this document preparation.
Thursday, November 02, 2006
BDT development
Business Data Toolkit (BDT) is the new way of programming in SAP. This is available in IS-PS (public sector) solution and I guess this is available in some other IS solutions such as insurance etc., This is a concept in which SAP provides you all the development components with which you can build your own screens and fields and weave it nicely within the existing SAP application. This is available mostly for the master data maintenance.
Given this input, I'll try to explain the concept in which I understood. Every SAP transaction can be thought in abstract to have the following components:
1. Data element & Domains
2. Screen fields
3. Field grouping (functional set of fields)
4. Views (Combination of one or more field group)
5. Sections (Combination of one or more views)
6. Screen (Combination of one or more sections)
7. Transaction (With one or more screen in a pre determined sequence)
If this above concept is clear, then it is very easy to understand and can even start development using BDT. For those who do not have enough exposure to the Grants or other modules that have BDT, I’ll try to give an analogy using the customer master record.
In the customer master the fields that are in the KNA1 table are the data elements and domains. The screen fields are the same as the data element, but the screen needs to be built and the definition of the screen specific parameters was defined in SAP’s delivered screen itself. For example the customer name is the data element AD_NAME1 and the related screen field is ADDR1_DATA-NAME1 (Program SAPMF02D/Screen 7000)
The field grouping is the group of functionally related screen fields, which can be turned as Required, Optional or Hidden using the configuration. In this case it could be the set of fields that cover the Street address
The views can be Street address and the PO Box address together
And the Section may be the combination of Name, Search term, Street address and the PO Box address.
The screen could be the Address, Control Data, etc.,
The screen sequence is defined and the transaction XK01/02/03 is created.
With the same idea in mind SAP had given the same concept as a development tool. This eliminates the need of extending the SAP’s standard table by appending structure. And also it gives you the flexibility to append two dimensional objects such as tables as well.
Wednesday, November 01, 2006
interesting problem
Eventhough you work for a long time in programming, say in ABAP, it is very difficult to keep in touch with all the evolving technoloagy and the concepts. and practical requirements are pretty simple and that do not need much of the complex programming techniques.
Most of the trivial programming requiremets are such as GUI operations, MS office interface, etc., can be easily built using the standard functions and can be kept as a tool kit. This will obviously be a effective methadology, as you don't have to dig over and over for the most common jobs.
Let me start posting the ABAP routines, I've developed, which can be used in any implementation.
The first posting will be a reading Excel file from the presentation server. This upload will take care of the excel files which contain macros as well.
Try and let's know if you are having fun
*&---------------------------------------------------------------------*
*& Report ZZ_TEST_EXCEL_LOAD *
*& *
*&---------------------------------------------------------------------*
*& *
*& *
*&---------------------------------------------------------------------*
REPORT ZZ_TEST_EXCEL_LOAD .
TYPE-POOLS: truxs.
PARAMETERS: p_file TYPE rlgrap-filename.
TYPES: BEGIN OF t_datatab,
col1(30) TYPE c,
col2(30) TYPE c,
col3(30) TYPE c,
END OF t_datatab.
DATA: it_datatab type standard table of t_datatab,
wa_datatab type t_datatab.
DATA: it_raw TYPE truxs_t_text_data.
* At selection screen
AT SELECTION-SCREEN ON VALUE-REQUEST FOR p_file.
CALL FUNCTION 'F4_FILENAME'
EXPORTING
field_name = 'P_FILE'
IMPORTING
file_name = p_file.
***********************************************************************
*START-OF-SELECTION.
START-OF-SELECTION.
CALL FUNCTION 'TEXT_CONVERT_XLS_TO_SAP'
EXPORTING
* I_FIELD_SEPERATOR =
i_line_header = 'X'
i_tab_raw_data = it_raw " WORK TABLE
i_filename = p_file
TABLES
i_tab_converted_data = it_datatab[] "ACTUAL DATA
EXCEPTIONS
conversion_failed = 1
OTHERS = 2.
IF sy-subrc <> 0.
MESSAGE ID sy-msgid TYPE sy-msgty NUMBER sy-msgno
WITH sy-msgv1 sy-msgv2 sy-msgv3 sy-msgv4.
ENDIF.
***********************************************************************
* END-OF-SELECTION.
END-OF-SELECTION.
LOOP AT it_datatab INTO wa_datatab.
WRITE:/ wa_datatab-col1,
wa_datatab-col2,
wa_datatab-col3.
ENDLOOP.
Thursday, October 05, 2006
Let's go to the business

SAP Public sector is not so different from others in majority of the aspects. The functional structure of the module makes it differ with the mainstream SAP solutions.
In IS-PS the existance of Funds Management (FM), rants Management (GM) and Budget control system (BCS) are the three major new areas that available in addition to the common logistics, FI, CO modules. Even HR can be very similar only if your organization is so unique as United Nations and whichhas its own est of rules and procedures. And SAP is also in the process of delivering UN specific HR module soon.
In the next coming days we can discuss more in detail on Funds andGrants module and also follow up on the Budget Control System. I'll try to give as much as functional background and technical information to make the reading easier.
Wednesday, October 04, 2006
My current assignment
I'm currently working with a large public sector in New York. Here we have SAP R/3 implemented for the last eight years. We are the ramp-up customers for the SAP IS-PS solution. we started implementing Grants and Budget control system as a part of the public sector solution.
We have a team of three functional members and a team of five ABAP programmers supporting this project. I'm very happy to work with this team as the members are so knowledgeable and bring in to the team a lot of value addition.
In the programming most of the concepts are new and we learned a lot along the implementation. I'll soon request my team members to share their valuable ideas.
Tuesday, October 03, 2006
About Me

I started my SAP career back in 1995 in India. And I assume, I'd have been the one of the first set of people who had an opportunity to learn and work on SAP. After my initial training in SAP for about one year, I came to US eying for a project and in all practical sense a real life experience.
 My first project was with a fortune 500 apparel and leather goods manufacturer in New Jersey. I've been told to develop some sapscript, which was considered to be very difficult by the analysts from ICS consulting (later they were bought by Deloitte consulting). I completed it in a jiff and got a good reputation right away. I was
  given master data load (material master and customer master) then was slowly involved in EDI and other related technologies.
My next project was at Phillips automotive electronics at Auburn, Indiana. This is a very small
 town close to Fort Wayne. This was an ASAP implantation. I was involved in the master data upload and the EDI implementation. The transactions I did was the Inbound/Outbound Orders and the outbound ASN. this was a terrific experience as the customer implemented the SAP formats as such without altering a lot. This project was only 3 months and I learned a lot in this three months.
My next stop was at Nash Finch Company at Edina, Minnesota. I was working for
 Ernest&Young Consulting. I was in the EDI group and focussed solely on the EDI transactions including ASN, PO, delivery and also in the preparation of the implementation guide for the EDI transactions. This was a eight month
  project ans the great thing about it is that I had an opportunity to lean ice scatting. My winter experience with Minnesota was not that bad, as 1997 winter was really mild, and we were playing Tennis during the month of September.
Next assignment was at Maxtor Corporation at Longmont, Denver. I was working for Pricewater house (not PWC at that time!). I was taken as the team lead for the EDI team till the
 time, they get a PWC staff to lead the team. The project was done at two places like Longmont in Denver as well as in San Jose in California. I did
  almost all EDI transactions such as Orders, ASN, delivery and was worked on the workflow on the purchasing documents. I completed this project by middle of 1998, and wanted to go back to India so badly (Home sick!). the skills I leaned were a little golfing, Hiking on the beautiful Rockie Mountains. By June 1998, I booked my tickets to India and flew back.
I got in to my next project with Wicto Corporation as I got the interview done in India and flew in and joined the project after my one month vacation in India. I was in charge of all EDI
 development including the workflow development and administration. I also did a lot of shell programming and did a lot of innovative things in this project. I also developed a self standing product in SAP for the purposes od divestiture. I built it based on ABAP and ALE technology. This company was later bought by another and got it name changed to CK Witco. Then got renamed as Crompton Corporation. I worked here for almost six years. the company has changed its name after another merger into Chemtura.
My next stop was to get in to a permanent position.
Subscribe to:
Posts (Atom)